Have a Question?
Setting Up Cloudflare
Already have a Cloudflare account? If so, skip down to ‘Create an access token’
1. Create a Cloudflare account
- Visit: https://www.cloudflare.com/
- Click on ‘Sign Up’ and follow the steps to create your account
2. Create an access token
- Go to your profile settings in the Cloudflare dashboard (icon at the top right of the screen)
- Click on the ‘API Tokens’ tab
- Click ‘Create Token’
- Click on ‘Use template’ next to the ‘Edit zone DNS’ option (this gives you the permissions to edit an existing zone and takes you to the ‘Create Token’ page.
- Add an extra permission to automatically create zones:
- click on ‘Add more’ (under Permissions)
- select ‘Zone’ -> ‘Zone’ -> ‘Edit’
- Add an extra permission to help authenticate the token is for your correct account:
- click on ‘Add more’ (under Permissions)
- select ‘User’ -> ‘User Details’ -> ‘Read’
- PLEASE NOTE: This permissions allows you to view the user that is associated with the token when you click on ‘Verify Token’. Without this permissions the plugin will still work, but an authentication error will be displayed when you click on ‘Verify Token.’
- Under ‘Zone Resources’, make sure you set ‘Include’ -> ‘All zones’ (unless you only want to allow some of your domains to be managed, in which case you can customize this as required.
This is how it should look at this stage:

IP Address Filtering
- For security purposes, it is highly recommended that you restrict this token to only allow requests from your server:
- In the ‘Client IP Address Filtering’ area, change Operator to ‘Is In’
- Add your IPv4 and IPv6 addresses to the ‘Value’ box.
- Note that Cloudflare seems to connect via IPv6 addresses by default (assuming they are available for your server), so if you have an IPv6 address, put this in here, as well as your IPv4 address.
- PLEASE NOTE: When you go to Verify the Token in the daflare admin, if you have this incorrect, Cloudflare will return an error with the IP address that you are connecting from. Edit the token and update the filtering with that IP address.
Confirm your settings
- Click on ‘Continue to summary’
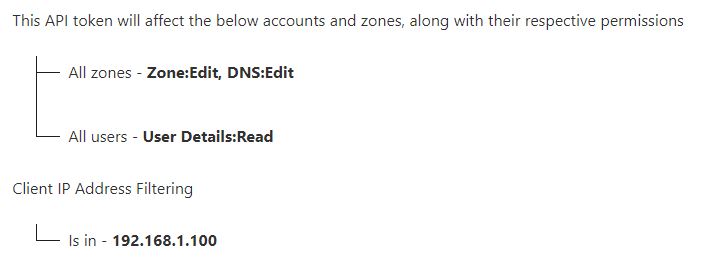
- The summary should show that a token is being created for “All zones – DNS:Edit, Zone:Edit” and “All users – User Details: Read“
This is how it should look (but obviously with your IP addresses listed instead)
- Click on ‘Create Token’
- You should get the message that the DNS API token was successfully created. Make note of this token, or copy it ready to paste into daflare – NOTE: this is the only time you get shown this token. If you do happen to forget to write it down, you are able to ‘roll’ the token and get a new one.
The token can be used for particular domains, or you can share it to use across all domains on your website. See the article on Configuration Considerations for more info.
ONLY IF you are using the token as a shared token between all domains, then you can add the token in Admin Config.
3. Find your assigned Cloudflare nameservers
Cloudflare will assign your account two nameservers from a list of about 30 available nameserver names. You will need to know your assigned nameservers to update your domain at your domain registrar, and to assign as your nameservers when editing your domain in DirectAdmin.
You’re new to Cloudflare
If you’re new to Cloudflare, you’ll need to manually add one domain to Cloudflare to find out what your assigned nameserver names are.
- Login to your Cloudflare account
- Go to your dashboard and click on ‘Add site’
- Enter your domain name and click ‘Add site’
- If you haven’t already selected a plan, select a Cloudflare plan (note that the free plan works perfectly with this plugin, but you may want to consider the other options)
- Your existing DNS records will be transferred across to Cloudflare. Click ‘Continue’
- The next page will display your assigned Cloudflare nameservers. Make a note of these nameservers
You’re an existing Cloudflare customer
- Login to your Cloudflare account
- Click on one of your existing domains
- Click on DNS
- Scroll down the page to view your Cloudflare nameservers. These are the nameservers that are used for all domains within your account
4. Use the Cloudflare NS records
If you haven’t done so already, you will need to add the NS records to the domains that you wish to be hosted at Cloudflare.
Using DirectAdmin, modify the NS records:
- DirectAdmin -> Server Manager -> DNS Administration.
- Click on your domain name
- Set the NS records to the nameservers as found in step 3 above
As an example, my NS records look like this in Direct Admin:

I have also set my server to automatically assign those nameserver records as the default for any new domain added to my server:
- DirectAdmin -> Server Manager -> Admin Settings -> Server Settings
- Modify the NS1 and NS2 records to the nameservers found in step 3 above
It looks like this:
